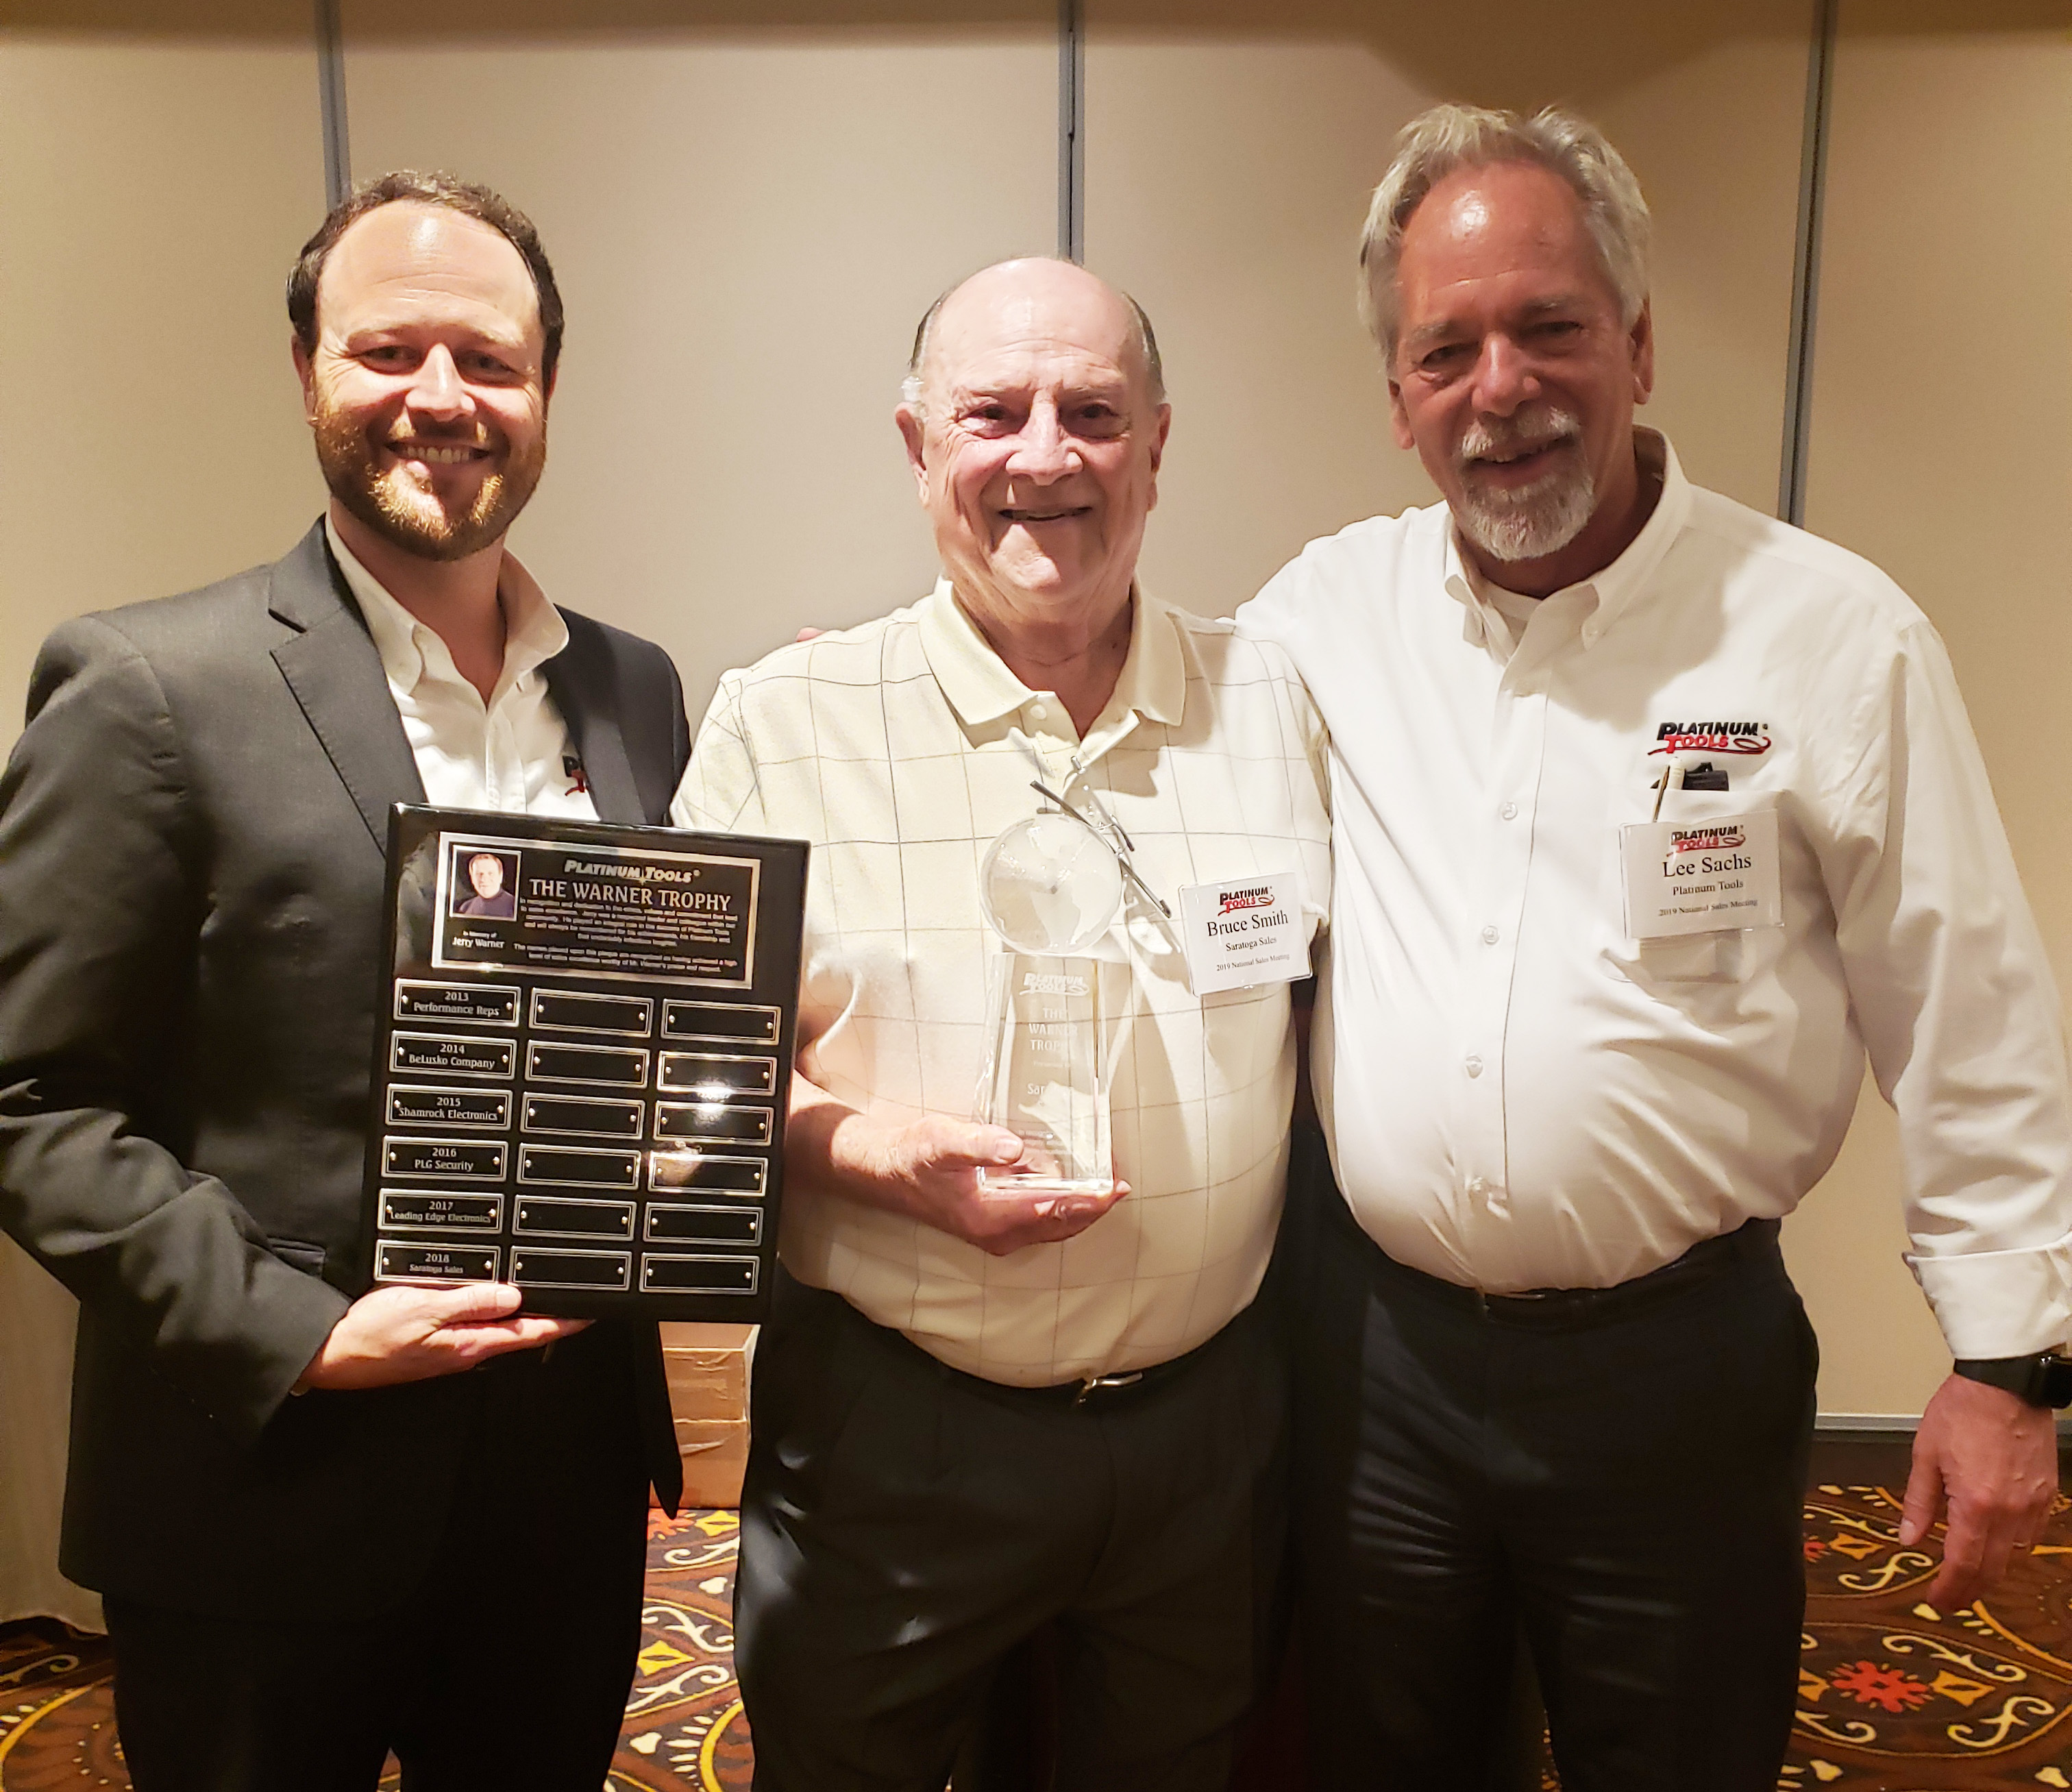
Can a Cat6 connector work on a Cat5e cable?

Cat6 Connector Cat5e Cable

If you’ve been running Ethernet cable or making patch cables for any length of time, you now have an assortment of RJ45 connectors and cable types representing the evolution of your network. You may be tempted to use what you have on hand to do your work, mixing and matching a bit. Visions haunt you of hunting through the cable jungle only to find that it was one of your cables that came loose, cable from connector, or even worse — looks just fine, but really isn’t making reliable contact. But is that just unnecessary worry?

It Just Might (Reliably) Work!

If you’re using Cat5e cable and all you have is newer Cat6 connectors, you may be all right. Generally, connectors may be backwards compatible with cable from older standards, but the reverse is not true — if you’re pulling Cat6 cable, time to update your Cat5e and older connector collection! There are some things to consider in proving that you’re using a workable combination of cable and connector, including a simple friction pull-test, cable and connector measurements, conductor fit and contact quality. There’s also the question of whether you’re already playing the odds with your cable quality.

Does It Hold Securely?

This is a simple test that determines whether the diameter of the cable is in the range which works with the Cat6 connector. This test ensures that the primary latch takes the strain of cable pull, rather than the conductors. Some Cat5e cables won’t be big enough for the latch to grab.

  1. Cut a 4 inch piece of cable
  2. Insert it into the connector
  3. Crimp the connector
  4. Tug and test the strain relief from the crimped cable

Do the Numbers Match?

Cat6 connectors are designed to accommodate much larger cable diameters than Cat5e, so most cables should fit — but check the numbers. For example, Cat6 EZ-RJ45 connectors from Platinum Tools use 0.275 inches as a maximum cable OD, which is plenty for a typical 0.205 diameter Cat5e cable. For these EZ-RJ45 connectors, individual insulated conductors must also be 0.041 inches or less to fit through the connector. Cat6 connectors are designed for 24 and 23 AWG conductor wire sizes, and less can be problematic. Most 24 AWG Cat5e cable should measure up, but depending on the source it sometimes it doesn’t, as mentioned below.

Will the Connections Work?

Conductor size determines whether the connection is going to be reliable or not. Although Cat6 solid conductor cables usually contain 23 AWG wire, Cat5e cables with 24 AWG conductors should seat and connect properly in the Cat6 connector. Conductors on the small side which worked for Cat5e may float or shift in the connector channels. This can cause problems ranging from an obvious open circuit to failure during certification. Ongoing issues from unreliable and incomplete surface contact may also occur.

Where Did You Get That Cable?

The volume of cable that installations use can tempt the use of questionable cable, often unknowingly. Purchasing can find a great price that appears to meet specs, but fails in the field. Cable such as “offshore deals” (some have other, more colorful names for it) can have marginal performance and quality. Marginal wire sizes, in particular, can produce intermittent or failed conductivity in Cat6 connectors, and PoE heat problems.

Once you do your homework, using those spools of Cat5e cable with new Cat6 connectors is a pretty safe way to keep moving forward with your network installations. Remember to check that the strain relief is from crimping the cable jacket, protecting the conductors, and that your conductors are seating securely in their channels for reliable connections at any speed, and in any rated conditions!

cat6a flex connector termination guide

How to Test PoE for IP Security Cameras

Test Poe IP Security Cameras

The wiring of security cameras has become much easier since the introduction of Power over Ethernet (PoE). This innovative method of powering internet capable devices means that no external power supply is needed and power is transferred over the Ethernet cable used to connect the IP camera to the system.

The system is simple, although some basic rules need to be followed to ensure that the camera receives power, and when something goes wrong, the only effective way of identifying what has happened is to use a digital network tester that’s capable of measuring PoE.

PoE Options

Two PoE options are available. Standard PoE provides a maximum of 12.95 watts at the device with a working voltage range that’s between 37 and 57 volts DC. Then there is a higher specification PoE plus, often written PoE+, that provides 25.5 watts at a voltage between 42.5 and 57 volts at the camera. Two operating modes are possible. Mode A supplies positive power on pins 1 and 2 and negative power on pins 3 and 6, while mode B uses pins 4 and 5 for positive power and pins 7 and 8 for negative power.

Two types of power supply are available. There is the midspan injector that’s connected between the switch and the camera. Midspan power is limited to 12.95 watts and only operates in mode B, using spare pairs that are not needed for 10Base-TX and 100Base-TX Ethernet. Alternatively, power can be supplied by PoE enabled routers and switches. This is compatible with 1000Base-TX Ethernet speeds and the power is supplied on data lines.

Practical PoE Concerns

PoE enabled devices interact with PoE power supplies so power is only supplied when a compatible device is connected. The actual power available at the power supply is slightly higher than the above specifications to overcome the resistance of the Ethernet cable. For PoE it is 15.4 watts and PoE+ it’s 30 watts. It’s also worth noting that there are four power classes providing a maximum of 4, 7, 15.4 or 30 watts at the power supply. If the cable is too long or if poor quality cable is used, it’s possible that insufficient power will be available to power the camera, and it will shut down; it is best to use solid CAT6 cable for PoE+ due to its higher current carrying capacity.

Using a Digital Network Tester

The easiest way to commission PoE is to use digital network testers like the Net Prowler™, Cable Prowler™ or Net Chaser™ available from Platinum Tools. If one of these Network Testers is connected to the Ethernet cable supplying the IP camera, the availability of PoE, the maximum power available as well as the supply voltage range and power supply mode can be established. The testers will also identify which pairs are transmitting the PoE voltage, test the link speed and its capability.

The Net Prowler supports IPV4 and IPV6 protocols, can ping IP and URL addresses and establish whether CDP or LLDP protocols are used. Other useful network capabilities are VLAN identification and the ability to map networks. When mapping, the tester will show MAC addresses, device names and their IP address.

Useful fault-finding capabilities include link light identification to identify which port the cable is connected to as well as a tone generator that, when used with an optional detector, can trace individual cores. The Cable Prowler and Net Prowler identify open circuits, short circuits and incorrect RJ45 connections, or splits as they are commonly known, as well as accurately measure the length of the cable or the distance to a fault.

How to test PoE for security cameras

New ezEX-RJ45® Termination Kits Available

ezEX-RJ45 Termination system

NEWBURY PARK, Calif., July, 2017 – Platinum Tools, the leader in solutions for the preparation, installation, hand termination and testing of wire and cable, is proud to announce the launch of four new ezEX-RJ45® Termination Kits.

Now shipping, Platinum Tools will feature the new kits during CEDIA Expo 2017, held in San Diego from Sept. 7-9 at the San Diego Convention Center, booth # 4452.

EXO™ ezEX-RJ45® Termination Kit (P/N 90140)
This kit includes electrician scissors, cable jacket stripper, EXO Crimp Frame, EXO-EX Die™ and 10 ezEX™44 connectors. All tools and connectors come neatly organized in the Platinum Tools heavy-duty nylon zippered case. “The EXO ezEX-RJ45 Termination System is the perfect mix of tools for new or experienced installers,” said John Phillips, Platinum Tools, Inc. product manager. “You don’t want to leave home without these essential tools.”

EXO™ EZ-RJ45® Termination Kit (P/N 90141)
This kit includes electrician scissors, cable jacket stripper, EXO Crimp Frame, EZ-RJ45 Die and 10 EZ-RJ45 CAT5E connectors. All tools and connectors come neatly organized in the Platinum Tools heavy-duty nylon zippered case. “The EXO EZ-RJ45 Termination System allows the user to prepare and terminate with precision and speed,” explained Phillips.

EXO™ ezEX-RJ45® Termination and Test Kit (P/N 90148)
This kit includes all the termination, preparation and test tools needed to properly terminate ezEX44 connectors. All tools, tester and connectors come neatly organized in the Platinum Tools heavy-duty nylon hanging tool pouch. “The EXO ezEX-RJ45 Termination & Test Kit is an all-in-one kit for the tools and test equipment needed for precision and speed in the field,” Phillips continued. See Platinum Tools Video on this kit.

EXO™ Deluxe Termination and Test Kit (P/N 90149)
This kit includes all the termination, preparation and test tools needed to properly terminate EZ-RJ45, ezEX44, and ezEX™48 connectors. All tools and connectors come neatly organized in the Platinum Tools heavy-duty nylon Big Mouth Tool Bag. “With this kit, you will be able to terminate various cable sizes and conductor diameters with precision and test for proper termination,” Phillips concluded. “The EXO Deluxe Termination & Test Kit is the perfect one stop cable preparation, termination and test kit.”

For additional pricing and more information on Platinum Tools and its complete product line, please visit www.platinumtools.com, call (800) 749-5783, or email info@platinumtools.com.

ezex-rj45-interactive-demo-cta

Platinum Tools Launches VDV MapMaster™ 3.0 Cable Tester

VDV MapMaster 3.0

We are proud to announce the launch of the next generation VDV MapMaster™ 3.0 cable tester during CEDIA Expo 2017, held in San Diego from Sept. 7-9 at the San Diego Convention Center, booth # 4452.  The T130 VDV MapMaster™ 3.0 is now shipping.

Based on the tremendous success of the award-winning VDV MapMaster 2.0, our 3.0 brings continuity testing, mapping, tone generator, and length measurement to the next level in one easy-to-use unit. Whether your jobs are commercial or residential, the versatility and added features of the VDV MapMaster 3.0 makes it a best value cable verifier for the professional installer.

VDV MapMaster 3.0

Made in the USA, the VDV MapMaster 3.0 tests Cat7, Cat6A, Cat6, Cat5e, and Cat5 shielded and unshielded cables, voice and coax. The MapMaster 3.0 is capable of identifying and mapping 20 locations at one time. The large backlit display, glow-in-the-dark keypad, a built-in flashlight and audible beep verification also helps the professional to work in the dark.

The VDV MapMaster 3.0 raises the bar for value-featured testers in this price range. Installers are asking for more than just a cable test and measurement tool. We’ve also added port blinking to allow port identification on switches that cables are connected to. Single-ended testing for shorts drastically reduces trouble-shooting with the MapMaster 3.0. It is the ideal instrument for installation, troubleshooting, and maintenance on telco, network, or coax cable in any situation.

VDV MapMaster 3.0

The VDV MapMaster™ 3.0

The VDV MapMaster™ 3.0 combines continuity testing, mapping, generating tones and length measurement functions into a single easy-to-use unit for installation, troubleshooting, and maintenance for telco, network, or coax cable. The back-lit display, glow-in-the dark keypad and a built-in flashlight helps you to work in the dark. Whether your jobs are commercial or residential, the versatility and added features of the VDV MapMaster 3.0 makes it a best value cable verifier for the professional installer!  More Info

Winter is Coming Promotion – Big Savings!

Contact your local Platinum Tools Distributor today!

Local a distributor – Where to Buy

Net Chaser – Cat6A Flex Connectors – 30 Piece Security Bit Set – Maxim 6 Wire Stripper – AC Voltage Detector – LanSeeker

 NEVERDull Punchdown Blades – Bridle Rings 1/4” – Wood – 1 1/4” & 1/4” – Wood – 2”

110V Outlet Tester – GFCI Socket Tester

Top 5 Reasons You Need a Cable & Network Tester

Cable & Network Tester

Network troubleshooting can be like untangling a big ball of string: awkward and time consuming. At the end of each string can be essential resources from servers and storage devices, access points and security devices to desktop computing resources, printers, telepresence equipment and IP telephones. Each layer, from the physical to application layers can be part of the tangle. A methodology or flowchart process is essential for a complete and definitive resolution.

A tool which supports methodical diagnosis and quickly tests each potential trouble source lets you solve your network puzzles routinely and quickly. For every question you have about the network’s condition, you get a quick answer. Additionally, a tool which helps you solve diverse network problems is also great for initial verification of cabling and network equipment.

Wield the Network Tester and Beat the Tangle

The network tester is that tool — it’s a combination of voltmeter, TDR, protocol analyzer, and more, combined with software to interpret and analyze results. When you know how to use a network tester effectively, you’re the one to call when network problems are causing headaches and need quick, effective action. Five reasons that it really is that good:

  1. RJ45 Test — making sure the physical layer is solid. This may be a first test if there’s a reason to suspect the cabling: if it’s new, or there has been construction nearby or other disruption.
    • Pinout
    • Continuity
    • Length
  2. Unlabeled Cable Hunting — a very common problem, unfortunately. Office and equipment additions often result in a hunt to find “the other end” of existing jacks. Without a network tester, this can result in pulling additional cable to save time.
    • ID remotes
    • Link light
    • Tone generation
  3. LAN Port Testing — if the local equipment is defective, you could waste time hunting a network problem that’s really right in front of you. To isolate the problem, checking the link and making sure the speed is up to par can help ensure that you have a good, active port.
    • Active link light
    • Speed
  4. Port Discovery — device and network identification. See what’s on the network, including virtual networks. Use Cisco and generic identification protocols, and identify potential troublemakers, configuration issues, and PoE problems.
    • Link capability
    • Power Over Ethernet with load test
    • CDP (Cisco)
    • LLDP
    • VLAN
  5. Network Function Testing — testing from the user/device perspective. Instead of putting a call in to have admins check their services, you can identify any problems with automatic IP address allocation that might affect new devices, check the response of devices already on the network using IPv4 or IPv6, check URL response of web servers, and locate unlisted and unexpected devices on the network.
    • DHCP
    • DNS
    • Ping
    • IPv4/v6 & URLs
    • Scan to discover or verify devices IP’s, MAC and SSID

Don’t Fall Behind

When selecting a network tester, one of the key criteria is how up-to-date the manufacturer keeps the device and its firmware. For instance, you want to be able to test the latest speeds and protocols. The Net Prowler is a powerful unit that can be given to techs for their everyday toolkit.

Be Prepared, Look Good!

A smoothly running network is the product of active monitoring and quick response when problems arise. Network testers give techs the ability to work through troubleshooting flowcharts quickly and decisively, not only ensuring that network service downtime is minimized, but showing the value of a well-prepared network management department.

Ethernet Speed Certification White Paper

The Flex Connector: Specs met, wiring problems solved

Flex Connector

There’s a new, flexible way to wire Ethernet. Cable sizes, high data rates, punchdown problems and bend radii are giving us copper headaches when we’re doing custom IT jobs or large-scale wiring. The Flex Connector looks like something we’d imagine, ready to solve headaches easily and let us go full steam ahead with our wiring, even in awkward locations.

The Flex Connector solves:

  • Limited tool selection needed — no crimp tool required!
  • Fast termination — set it up, close it and go
  • Terminate new larger cable O.D. sizes easily.

Does the Job, Meets the Standards 106230 Cat6A Flex Connector, Shielded

The Cat6A Flex Connector is not just a new RJ45 connector: it’s a completely redesigned connector, using new technologies like flexible circuit board material to do its job correctly and still meet standards such as EIA/TIA-568-C.2 and TIA 1096-A like a champ.

Since the Flex Connector meets so many needs, it’s certified for many different applications. From ESS to plenum, factory floor to office environment, it’s ready to do the right job with a secure connection.

Solves Appearance Problems, Too

Cables sprout straight out from wall plates, creating unsightly cable routing, trip hazards, and the risk of furniture bumping and damaging the entire assembly. With 90 degree turns cables drop directly from wall connections, clinging to the wall and staying discreetly out of the way.

Desktop devices from PCs to routers and peripheral equipment don’t have to be placed to leave room for cable bends. Devices can be nearly flush with the wall as the cable drops away at 90 degrees, dressed and routed cleanly and professionally. It’s not just for Cat6A; any RJ45 connection can use a Flex Connector RJ45!

106220 Cat6A Flex Connector, Non-ShieldedSpecialized Applications

Rated for Electronic Safety and Security applications, Cat6A Flex Connectors make it easy to connect IP cameras, access control devices, and other network hardware that requires a direct, sometimes awkward connection rather than a wall plate and jumper which can create security and reliability issues. Running Ethernet to AV controls in the wall, carrying long-haul HDMI to projection systems, or wiring a broadcast studio, it meets the physical connection needs and handles up to 10 Gig data traffic with ease.

Snaking up a conduit to connect to an IP camera, the Flex Connector makes direct connections with authority. It’s plenum rated, so it’s also excellent for routing to access points and other devices distributed throughout a building. With easy 45 and 90 degree turns, you can avoid damaging tight radius bends and the stress they put on both cable and connector.

Flex Connector

Simple Termination

Strip-organize-terminate is an easy way to remember the steps for adding a Flex Connector to your quality cable. There’s not much more to it: organize to the wiring code after stripping, terminate without a tool, and test. Faster and more reliable termination, plus more flexibility!

Get Informed; Start Solving Problems

Putting any new product into play requires verification that it’s suitable for the job, and gaining some knowledge of how to use it. For the first, check out this white paper: it covers questions and concerns, and gives lots of good news about all the problems you can solve with the Cat 6A Flex Connector.

To put the Cat6A Flex Connector connectors into practice, this datasheet shows the short and sweet process for terminating with the Flex Connector: it’s easy to do but still good to be confident that you’re following an established procedure. Download, check them out, and start thinking of all the applications you’ll be using Flex Connectors for right away.

Cat6a Flex Connector White Paper

How to terminate CAT6A connectors in the field

How to terminate cat6a connectors in the fieldCAT6A is a whole different animal. It’s attractive for high performance video and audio applications including broadcast television studios, server rooms, and other demanding tasks. It also contains more protection against interference and signal leakage. Using higher speed data rates, up to 10 Gig now, means you’re even further into radio frequencies.  As frequencies increase, demands placed on cable impedance, shielding, grounding, and termination increase as well. When you push the data rate, you’ll see the effects of any termination issues, even if the connections look good. Since the cable types and termination kits have changed to CAT6A and above, it’s important to revisit how you do termination in the field.

Summary

The larger and more difficult Cat6A cables to work with require a specific connector design to accommodate the cable jacket size. These Cat6A cables are designed to process data at high speeds and thus need to be resistant to RF. To do this the cables must be heavily shielded and large cable jackets must be used. Standard connectors will simply not fit these larger cables so specialty connectors and crimp tools must be used instead.

Steps

Start with clean hands, cable, parts, tools to avoid electrical irregularities in the finished product

  1. Put a boot on the cable for later use

    Put a boot on the cable for later use

  2. Strip the cable jacket about 2 inches, cut foil (if present) to 1/4″ and pull back over jacket
  3. Separate the twisted pairs and drain wire; ensure that there were no kinks in any of them

    Separate the twisted pairs and drain wire; ensure that there were no kinks in any of them

  4. Separate and arrange pairs for desired wiring standard, then cut across all wires

    Push wire bar onto all wires, to 3/16" from jacket, then cut wires flush with wire bar

  5. Push wire bar onto all wires, to 3/16″ from jacket, then cut wires flush with wire bar

     Push wire bar onto all wires, to 3/16" from jacket, then cut wires flush with wire bar

  6. Carefully reshape the cable jacket using lineman’s pliers or similar for easier insertion

    Carefully reshape the cable jacket using lineman's pliers or similar for easier insertion

  7. Insert prepped cable into the connector until copper conductors are seated at front of connector housing

    Insert prepped cable into the connector until copper conductors are seated at front of connector housing

  8. Insert connector into Tele-TitanXg  crimp tool and terminate;  Note: 10 gig connectors are not compatible with standard modular plug crimp tools.

    Insert connector into Tele-TitanXg crimp tool and terminate; Note: 10 gig connectors are not compatible with standard modular plug crimp tools.

  9. Roll drain wire into coil using needle nose pliers or similar

    Roll drain wire into coil using needle nose pliers or similar

  10. Put drain wire coil and foil if present under external ground tab, press tabs down with flat blade screwdriver or similar to hold in place

    Put drain wire coil and foil if present under external ground tab, press tabs down with flat blade screwdriver or similar to hold in plac

  11. Crimp external ground tab to cable, rotating large then small cavities of crimp tool

    Crimp external ground tab to cable, rotating large then small cavities of crimp tool

  12. Finish by pulling boot over connector

    Finish by pulling boot over connector

Cautions

Remember, the big issue with CAT6A is increased sensitivity to RF issues, from interference to proper termination and grounding. CAT6A is rated for long-haul 10 Gig data, up to 100 meters, which allows the opportunity to develop performance problems if not properly installed and terminated. Prevention of cabling problems starts with careful termination.

Visual Inspection

Ensure that the external ground tabs are not deforming the cable excessively or biting into the wires, and make sure that all contacts are uniformly seated. If there are signs of dirt, water, oil or other materials, consider cleaning or re-terminating to avoid difficult to identify performance problems later.

Electrical Testing

With high performance cables, it’s important not to “test into success” using test equipment to correct errors. When you carefully build high quality terminations, you create your own success and should have very few problems. Use testers rated for full speed data, and check the cable for electrical characteristics, data rate performance, and possibly simulated network traffic. Test the cable installed if possible, not coiled, as characteristics will be different.

Easy Kit to Use

The Platinum Tools 10 Gig Termination Kit contains the tools and connectors to bring you up to date with CAT6A termination quickly and easily. Designed to work together, they help make reliable connections easily even for demanding high-speed applications with larger, new technology cables.

10gig termination kit